You probably remember how in childhood you were forbidden to run without shoes in the winter, because the “floor is cold”. The warmest place in the house was near the battery - it was there that your cat always slept. And now, getting out of a warm bed in the morning, when your legs are already cold in anticipation of ice slippers, you involuntarily think - if the whole floor were like a battery ...
Modern technology allows you to give your feet such a miracle - a warm floor. In our article we will discuss the device of one of the types of underfloor heating - a water floor, which operates according to the principle of a conventional battery and is heated by hot water.
Briefly familiarize yourself with the device and the process of installing a water heated floor can, looking at this video:
The video describes the process of installing a water floor, which was chosen as an alternative to conventional radiators: they were dismantled and completely replaced with a floor heating system. At the end of the plot is a water floor sectional view.
What is a water floor heating system?
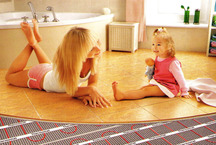
Water floor elements
As the name implies, the supplier of heat to the rooms in this case is water. Water-heated floor is a "layer cake", laid on the ceiling between the floors or directly on the formed earthen floor (if the work is carried out on the first floor of a private house).
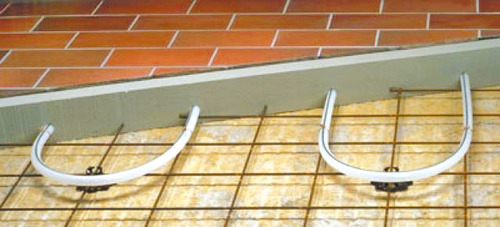
Photo: www.stroyka.ru
The photo clearly shows the individual layers of the water floor system:
- the bottom one is a layer of heat and waterproofing;
- the next is reinforced mesh;
- even higher are the pipes through which water flows;
- around the mesh, pipes and over the pipes - concrete screed;
- the top layer is your chosen flooring (in this case, tile).
Some branded sets of water heated floors include special plates with protrusions (see photo below) that hold the pipes.
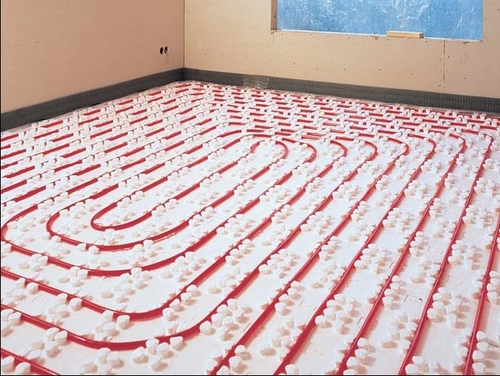
Photo: admin.elplast.ru
Above the slab and pipes will also be a concrete screed and floor covering.
Floor coverings for water floor
Almost all types of flooring resistant to heat are compatible with the water floor system. The best flooring for water floor heating - tile. The tile has a high heat transfer coefficient. This means that the cold (for example, from a concrete floor), she also holds well. Therefore, unheated floors, tiled, very cold.
In second place in terms of frequency of use with underfloor heating is laminate. He conducts heat well and accumulates it.
Linoleum together with a warm floor is rarely used, we do not recommend using this combination in children’s rooms - if overheated, linoleum can release harmful substances.
Parquet is not recommended to be used together with the heating system, since the tree is very demanding on the temperature and humidity conditions. In case of violation of the operating conditions, this expensive material can completely lose its external attractiveness (will dry out, crack).
The advantage of water warm floors
In private houses (especially large areas), water floor is the best solution. A water-based heating system consumes less electricity than, for example, an electric underfloor heating.
Water floor can be the only source of heat in the house or combined with a radiator system. Radiators are connected if the temperature drops sharply outside and the water floor cannot cope with the heating of the house. But the experience of using water floors in the central regions of the Russian Federation and in Siberia at temperatures of -20 ° - -30 ° with strong wind showed that a properly assembled floor heats well and maintains a temperature of + 25 ° - + 30 °.
An example of sharing a heated underfloor heating and radiators is shown in this video review:
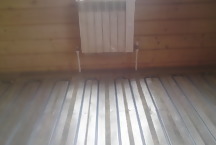
The video shows a mounted floor heating system in a 50-square-meter wooden house. m
Pluses water heated floor:
- floor heating uniformity;
- profitability in the process of use;
- the possibility of heating a large area of houses without the use of additional heat sources.
The main cons of the water floor:
- the complexity of installation (to assemble it with your own hands, you need to have the skills of plumbing work, to be able to level the floor, make a screed - not to mention the design!);
- the inability to instantly change the temperature of the floor.
Water warm floor in a city apartment
If you live in a city apartment, most likely you will not be able to install a heated floor. In a high-rise building, a water floor system needs to be connected to something. Independently (without approval) to connect any devices to hot water supply or central heating is prohibited by law.
Water floor in one of the apartments can create inconvenience for neighbors: passing through your apartment, water gives off more heat than provided by the design of the heating system of the house (in which your warm floor was not included), which means your neighbors will not get this heat volume. A drop in pressure in the riser is also possible (especially if the floor is improperly mounted, the pump does not work well or is completely absent). Neighbors from below can be unhappy with the noise of water in the pipes above their heads (there were such complaints).
The device of a water floor in a city apartment building is fraught with great difficulties, including administrative. But the stage of coordination in this case is absolutely necessary. If you are not ready to solve all these issues or have been refused by the administration, the electric floor heating system or an additional radiator is the best option for you.
A happy exception is some houses of a modern construction, in which there is a separate riser for connecting a water floor. You can install such floors in them.
Purpose of the elements of the water floor heating system
The following basic elements are a part of the kit for laying of a water heat-insulated floor:
|
Materials for warm water floor |
Purpose |
|
Polystyrene, polystyrene plates |
Thermal insulation - prevent heat loss down (to the basement, lower room, floor) |
|
Penofol, polyethylene film |
Hydro- and vapor barrier, the effect of additional energy savings. The film maintains the normal moisture content of the concrete (otherwise it will lose strength). The foil layer reflects the heat rays back into the room, does not allow them to go down, and also protects the air from the styrofoam vapor |
|
Steel reinforcing mesh |
Strengthens the concrete screed, does not allow the concrete to crack from temperature changes. Serves for fixing pipes |
|
Damping tape |
It is made of polyethylene foam. It protects the concrete screed and the walls of the house from destruction during thermal expansion. Prevents heat loss through the wall. |
|
Pipes |
Hot water is brought into the room and cooled |
|
Collector |
It maintains the set temperature in the circulation circuit, regulates the water flow depending on the temperature of the circuit. Distributes water between separate heating circuits. Includes feed and return manifold. |
|
Automatic control system |
|
Laying schemes water heated floor
Three basic pipe layouts in a water floor system are used:

- Snail.
The pipes are arranged in a spiral. Forward and reverse pipes run in parallel, which gives a uniform distribution of heat on all parts of the floor. This option is suitable for rooms with increased requirements for heat. With this method of laying the contour does not have sharp bends and makes fewer turns, so you can set the minimum spacing between the lines and use more rigid pipes. Water flows along such a circuit more easily. - Snake.
The easiest installation option. The diagram shows that the pipe is hot at first, and cold at the end. But in a small area the temperature variation is minimal. - Double snake.
More uniform distribution of heat over a large area than in option 2. This scheme of a water heated floor is suitable for large rooms with a high thermal load.
For each floor heating system, you can calculate the maximum permissible length of the contour. If the dimensions of the room are large, several separate contours (consisting of a single pipe section, without joints) are placed in the same room. On the line of separation of the contours stack damper tape. Each circuit is connected to a collector.
10 most common mistakes that make when laying water floor heating
- Insufficient cleaning and preparation of the base. Leave the roughness rough draft, traces of plaster, debris in the hope that the layers of insulation hide everything. But the problem is that polystyrene is a dense material, and it cannot compensate for the deficiencies of the surface.
- No damping tape on the edge. Due to the expansion and contraction of concrete, changes in temperature on the screed without insulation from the wall may cause cracks.
- Incorrect mounting of the damper tape (the tape is poorly fixed to the wall or not fixed at all).

Photo: eurosantehnik.ru
There is an erroneous opinion that for a snug fit of the damper tape to the wall, it is enough to press it with a tie when filling the floor. However, in this case, the tape will not be able to perform its functions. The tape must be laid tightly, without voids. - Not laid a layer of polystyrene foam (or similar material). The lack of insulation, of course, cheapens the cost of laying a water floor, but will lead to heat loss. You will not get the floor of the temperature you dreamed of.
- Wrong choice of material parameters for insulation. Thermal insulation layer too thin leads to heat loss, insufficient heating power.
- Use of cheap or low quality pipes and fittings to reduce the cost of the project. Corroded metal pipes can leak. It is dangerous to use in warm floors and cheap fakes for branded plastic pipes.
- Pipe laying not according to the scheme, uneven, with violation of the calculated pitch between the pipes
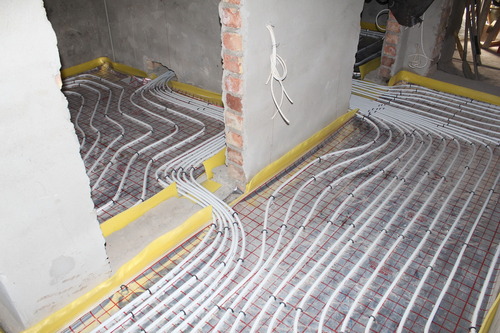
Photo: eurosantehnik.ru
When the pipes are laid exactly on the markup - it is not just beautiful. It would seem that nothing is visible under the screed. If the pipe moves a centimeter away from the markup - it is not very scary. Although with leakage pipes, laid exactly according to the scheme, it is easier to find.
But if on the floor you have such a picture as in our photo, you know - you will not be able to adjust the floor temperature. You will get a "striped" floor with alternating hot and cold streaks. At the entrance to the room is visible overheating of the surface. - Use as part of screed claydite. Expanded clay is often added to the flooring solution on the ground floor as an effective heat insulator. Such a screed over the warm floor nullifies all your efforts.
- Poor floor casting solution, absence of plasticizer in its composition. All this reduces the strength of the floor and its thermal conductivity.
- Heating too early - before the drying time of the screed - leads to a violation of the strength and integrity of the floor.
Now that you know how to NOT do it, get acquainted with the technology of laying underfloor heating.
Water floor heating do it yourself: installation, connection
This section should be read if you want to install a water-heated floor yourself. If it is decided to invite the assembly workers, also study the material - then you can competently control the process. You will do everything efficiently and do not take extra money for some reason.
This video clip demonstrates the installation of a “water heated floor” heating system on the example of work in the business center of St. Petersburg, in the premises of which there is not a single radiator. All stages of installation of a water heated floor, starting with the project, are visually shown and commented.
Stage 1. Drafting.
The project of a water heated floor includes the layout of the heating circuit (pipes), the parameters of the pipes (type, diameter, total length), the points where control devices and collectors are located.
The pipe laying plan can be drawn up using a computer program or drawn on graph paper. The main thing - that he was. As an option, the design of a water floor is ordered by a professional designer, and the rest of the work is done by hand, following an approved plan.
Stage 2. Installation of the collector.
The collector can be supplied assembled or disassembled - then it must be assembled into one unit according to the manufacturer's instructions. A collector cabinet is intended for the placement of the collector block - it is installed on the wall, close to the floor, in a place marked on the diagram.
Stage 3. Analysis of the initial state of the floor and its alignment, if necessary.
It is necessary to measure the height difference. It is believed that the differential within 1 cm is permissible. If the difference is greater, the floor is leveled. For this purpose, a primer for concrete is applied to the entire surface (it improves the adhesion of the mortar to the base). With the help of a laser level, a predetermined height of the future floor is marked on the walls. It is most convenient to use the device, but you can take other tools, for example, mark water levels.
From the leveling mixture (for example, peskopeton M-300) form beacons - strips, on top of which are placed metal strips. By adjusting the height of the slats above the floor (pressing them into the concrete), the level of the floor plane is set on all beacon strips. According to these beacons lying in the same plane, they are oriented when pouring. The building mixture is poured between the beacons and leveled, observing the level. After drying, you should get a flat surface.
If the floor errors are small, the grooves can be leveled by spilling sand.
Stage 4. Installation of the damping tape.
After the floor is prepared, a damper tape is laid around the perimeter of the room and tightly, without voids, is fixed to the wall. The tape can be self-adhesive - then it is glued.
Stage 5. Laying the film.
The function of the film is heat, steam and waterproofing. It is placed under the heat insulation plates and, as an upper layer, depending on the humidity conditions of a particular room. Instead of the film, it is permissible to use other insulating materials permitted for use in construction. The film thickness is selected in accordance with the regulatory documentation (most often take a film thickness of 100 microns). The film is carefully spread on the floor, its individual strips must be laid overlapped. The edges of the film, laid on top of the plate, must be carefully tucked under polystyrene.
Stage 6. Laying insulation.
As a thermal insulation of a water heated floor, use plates of polystyrene foam, foam polystyrene or similar materials. The thickness of the insulation layer must be at least 5 cm, and if you have the first floor located directly on the ground (not above the basement), then at least 10 cm. The plates are laid end-to-end.
Stage 7. Laying reinforcing mesh.
The recommended grid parameters are 100x100 (or 150x150) mm, bar thickness is 4-5 mm. In some cases, double reinforcement is used - the grid is placed not only under the pipes, but also on top (to increase the strength of the system).
Stage 8. Laying pipes for water according to the scheme.
Pipes are sold in coils. The bay is neatly unwound and the pipe is laid on the grid according to the scheme described in the project.

Photo: interplazasharm.com
Modern pipes for water floors are very flexible and durable, can withstand heavy loads at fracture. Therefore, professional installers do not use auxiliary tools for pipe bending - they do it manually. The beginning and end of the pipe are always near the collector. The recommended distance between the pipes in the circuit is 100-300 mm. Near the cold walls, the step is made less than on the main surface. The method and step of installation is specified in the draft water floor. In one circuit, the pipe must be integral. Tubes are attached to the grid by clamps with a step of about 30-35 cm.
If special expanded polystyrene plates with protrusions are used for fastening, the pipe is placed in the slots intended for it. How this is done can be seen in the following video on the example of installing a Valtec underfloor heating system:
Step 9. Connect the pipes to the collector.
Near the collector, pipes from all circuits come out of the concrete screed. Special metal corners that protect the pipes from abrasion are put on the protruding sections of the pipes. The ends of the pipes are cut to the desired length only after the collector itself is fully mounted (to avoid mistakes). Cut the pipe should be strictly perpendicular to its surface (only in this case, the strength and tightness of the connection will be ensured). The pipe is connected to the collector outlets using compression fittings. Near the collector many pipes come together, so part of them are hidden in a protective corrugated pipe (to protect against overheating). In order to regulate the temperature using a room thermostat, servo drives are installed on the pipes, which are connected to the communicator connectors (a device that controls the pump and turns on filling the floor with hot water).
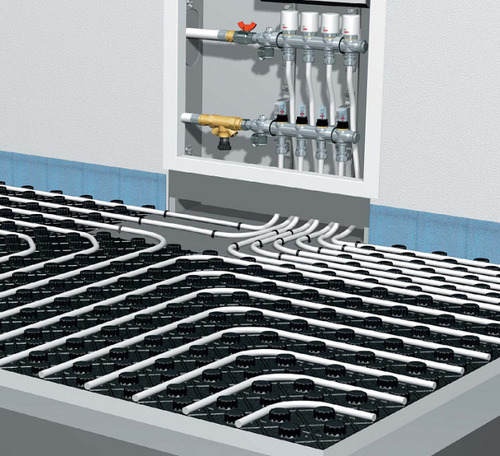
Photo: svojahibara.ru
Step 10. Balancing the collector.
By balancing we mean the setting of the work of the collector in accordance with the length of all circuits. The balancing table is attached to the floor heating project. It indicates the position of each valve (number of turns).
Stage 11. Hydraulic testing.
The system needs to be checked for leakage and operation. To do this, the pipeline is filled with water under pressure. In winter, the system is tested without water (compressed air). The pressure in the system is maintained all the time while the screed is poured.
Step 12. Fill screed.
Fill and level the mixture should be careful not to damage the pipe. The recommended thickness of the screed is 5-10 cm from the thermal insulation layer. Too thin layer is less durable. A thicker layer increases the thermal inertness of the floor (it heats up more slowly and cools more slowly - it is difficult to regulate the temperature). Special mixes for warm floors are used for pouring, but the usual cement-sand mortar used for leveling (M-300) can also be used.
Stage 13. Drying screed.
The optimal drying time is 28 days.
Stage 14. Alignment.
Again, as at the very beginning, they close up small cracks and irregularities, remove pebble stones, ground the surface for better adhesion and pour self-leveling mixture.
Stage 15. Installation of the finish coating
Laying tiles, laminate, etc.
Overview of the main suppliers of components for underfloor heating
The largest manufacturers of water-heated floor systems supply our market with all the elements necessary for floor heating: pipes and insulating mats, fittings and control devices for control. You will get the best result if you use all the components of the same manufacturer. In this case, all parts are guaranteed to be compatible with each other. But you can collect the water floor and from different parts, as a designer. Then you yourself or the master you hire will have to carefully select the elements of the system that match each other.
|
Manufacturer / Brand |
Manufacturer Specifications |
|
Warm floors Uponor |
The company exists since 1918, founded in Finland. It supplies equipment for heating, water supply, floor heating sets. |
|
Underfloor heating Kermi |
One of the largest and most famous manufacturers of heating systems in Europe. |
|
Oventrop underfloor heating |
The company was founded in Germany in 1851. It manufactures and supplies components for heating and underfloor heating. |
|
Heated floors Rehau |
The company appeared in Germany in 1948. Produces a variety of goods (mainly from polymeric materials), including in the field of heating and water supply. |
|
Heated floors SANEXT |
Russian developer and manufacturer, supplying to our market the full range of equipment for underfloor heating, as well as water supply and heating. Products used since 2005 |
|
Heated floors Thermotech |
Russian company. On the market for over 15 years. The range of services also includes the design, installation, service facilities. |
|
Underfloor heating Watts |
Large European concern - manufacturer and supplier of heating and water supply systems |
|
Underfloor heating Valtec |
Russian-Italian trademark under which various elements of engineering plumbing are produced. The company appeared in Italy in 2002. |
Water heated floors of all listed manufacturers are characterized by high quality and are widely used in different regions of the Russian Federation. The pipes are provided with a multi-year warranty (for polyethylene - up to 50 years, Rehau gives a guarantee for the life of its pipes, even up to 100 years, provided the temperature is kept within + 60 °).
Which pipes are better suited for a warm water floor?
For example, we compare the characteristics and prices of polyethylene pipes for a warm water floor from the best manufacturing companies that are popular in our market. For comparison, selected pipes with a diameter of 16 mm.
Prices of pipes (polyethylene) for a system of water floor heating
|
Name |
Pipe material |
Specifications |
Price for 1 p. M. |
|
Uponor PE-Xa |
cross-linked polyethylene PE-Xa |
the maximum t of the coolant is 95 °, the working pressure is 6 bar, the minimum bending radius is 5 pipe diameters |
83,00 rub. |
|
Kermi PE-Xc 16x2 mm |
PE-Xc |
58,00 rub. |
|
|
Oventrop Copex PE-Xc 16x2.0 mm |
61,00 rub. |
||
|
Rehau Rautherm S 17x2 mm |
polyethylene RAU-PE-Xa + EVAL) |
82,00 rub. |
|
|
Pipe semi-ethylene SANEXT 16x2 mm |
Pex-b // EVOH // Pex-b |
43,00 rub. |
|
|
Watts INTERSOL 16x2 mm |
Pexb |
the maximum t of the coolant is 95 °, the working pressure is 10 bar, the minimum allowable bending radius is 3 pipe diameters |
39,00 rub. |
The table shows that the pipes for water floor from different manufacturers have similar performance characteristics. Most famous brands produce good quality products.
Choosing the best water heated floor system, just remember that you should not save on materials. You can install pipes of unknown origin in the screed, but who will you blame if they run from you in a year? Repair of floors will cost much more than the initial savings on materials.
Summary
If you have decided to install a floor heating system in your house and were convinced that technically it is possible in your conditions, invite a company with a long record of work in this market to install the system. Read reviews, see examples of works that have already been done by masters. Check that the company installs equipment from a reputable manufacturer and gives a guarantee on its work. It is desirable that the same company was engaged in the maintenance of water floors.
If you want to collect a water-heated floor with your own hands, select a high-quality system (again, from a reputable manufacturer), take a careful look at the design stage, strictly follow the technology - only then you will succeed and your legs will no longer freeze.